Ever So Tweetly

    follow me on Twitter
    Showing posts with label DIY. Show all posts
    Showing posts with label DIY. Show all posts

    Friday, November 06, 2009

    Visual Kei On a Budget: A Photo Tutorial


    Okay, I know it is almost an oxy-moron. Visaul Kei and budget don't even belong in the same post, much less the same sentence!

    If you are familiar with cosplay, the Final Fantasy games, J-pop, or anime at all, then you have an idea of what Visual Kei is.

    But only the vaguest of ideas...

    See, Visual Kei is a music genre that encompasses a bizarre combination of what happened when 80's hair bands, Jpop, and punk smashed together, and created something altogether new. Born in Japan, it mixes cosplay, metal, gothic and glam. Visual kei bands are very extravagant, and you can usually tell a Visual Kei band or artist by their elaborate costumes, crazy-impossible hairstyles, and bold, daring makeup, usually applied over some variety of lighteining foundation. Want an idea of what I'm talking about? A simple example:

    "Dir En Grey" Get the idea? Of course, this is not our favorite Visual Kei band, but this promo shot has the most varied imagery on which to base a generalized idea of the genre. *smile*

    So, two days before Halloween, Willamina tells me she would love to be Visual Kei for her costume. Being me, I tell her that's no problem, and I can make that happen. She protested, saying we had nothing that would work for a costume that elaborate, and I gave her a short list of things to acquire from our closets, and the costuming bucket while I went out shopping.

    A little while later, I returned with a can of hairspray, some red lipliner (I needed some anyway), a small jar of ivory foundation, a tube of white clown makeup, and some black eyeliner (useful for both her and her sister's costume). Total cost; about $20

    Yes, that's all we're working with here. Budget-minded enough for you yet?

    No? Okay, I didn't really have to buy the $7 hairspray, and I couldn't find red lipliner at the dollar shop, so sue me. *wink* If I had, though, or we'd had some liquid foundation at the house, I could have gotten away with spending a mere $6, tax included. Better? *grin*

    When I returned, she had gathered my little stretchy vest, a red scarf, some leftover red hairspray from some other event, her little sister's white dress shirt, a couple of punk lace-up arm warmers I got on clearance last year after Halloween, some gold chains she had lying around, her black exercise pants, a punky leather collar, black pleather boots, and a sleeveless little t-shirt-like overcoat that buttons in the front. You know the kind that proper young ladies wear over their plain, long-sleeved dresses in the winter?

    So with all of these disparate items, I got to work.

    First came the sketch. A working example of what I planned on creating. Not pretty, but functional, and it gave a decent idea to W as to what I intended for her. But still she couldn't fathom how, exactly, I was going to pull it off with the seemingly meager supplies we had brought together.

    Then I dressed her partially and set her in the chair for hair and makeup.

    Doesn't she look so very excited? This, my loves, is a picture of teen disbelief. She was willing to let me try, but didn't think it would turn out very well, despite the fact that I told her that her hair alone would take me nearly two hours to complete...

    Somewhat more excited here, about 45 minutes into her hairstyling. Resting frequently to assuage the complaints of "yanking my hair out of my head", these sacrifices were necessary for "the look" she wanted. We still have not touched the colored hairspray in this shot, this is the (dyed) color of her hair.

    Of course, after a lot more time, and application of the colored hairspray to the tips of her spikes only, we achieved this (spray drift caused the blended-color effect).

    Makeup was quick by comparison, custom-mixing the shade of pale that I could easily blend with the natural shade of her neck, drawing on the bold lip design and eye makeup, and finishing off with kanji on her cheek just for spice; the Japanese character for "candy". Perfect for trick-or-treating!
    Hoping to grab a cheap pair of ears for her sister's costume before our homeschool group's Halloween party, we dropped off at a local big box store. We didn't find any pink kitty ears, but we did find something perfect for W's costume!

    A broken umbrella, and I knew just what to do with it, too!

    Ah, sweet broken umbrella, discarded, unloved. The most overlooked piece of costuming potential to ever sit abandoned on the ground at my feet...

    Oh yes, I had plans for that umbrella, and my plans involved a pair of scissors and some safety pins.

    After that, it was simply a matter of finding a suitable backdrop for a photo of the finished product.
    Costume bonus; every time the spikes were pushed down, they sprang back into place!

    Saturday, August 08, 2009

    Late Season Gardening: Beautiful Bountiful Containers

    A commenter asked me about starting tomatoes in a container this late in the season.

    Since we share similar interests, I thought I'd share my answer with you as well.

    To get a tomato producing if you plant it now, you will have to pick an "early" type of tomato, and water the first three days with hydrogen peroxide to speed sprouting. You will still be able to get a good harvest, and if you fertilize weekly with vermicompost tea, and bi-weekly with organic fish emulsion, milk, Epsom salts, and randomly stick spent match heads around the root system, you will get a plentiful harvest.

    As long as the tomato has 5 gallons of soil, it will be fine and produce well. I use 10-15 gallon planters, and plant a ring of herbs around mine.

    I have frilled purple oregano, onions, and basil, planted alternately in a circle around each of my potted tomatoes. I am also starting flowering garlic chives for height and visual interest so the planters will be highly decorative as well as useful, and thus, not offensive to the neighbor's potentially delicate aesthetic sensibilities.

    On the other hand, if you aren't particularly set on tomatoes, there are many other food plants that thrive in containers and produce very quickly, as well as the cooler-weather plants that it is already time to plant in time for fall production before the frost such as Brussels sprouts, lettuces, broccoli, cabbage, spinach, and cauliflower to name a few.

    Among the many plants that can be grown in containers successfully, there are beets, peppers herbs of all sorts, potatoes, tomatoes, bunching onions (the tall ones), radishes, lettuce, rhubarb, celery, dwarf fruit trees, chard, zucchini, squash, corn, any vining fruit or vegetable, beans, peas, cucumbers, greens, gourds, turnips, lettuces, strawberries, and blueberries.

    Pretty much anything can be grown in a container if the soil area is large enough for the roots of the plant. That said, however, most plants can be planted twice as close to each other as the seed packet recommends for higher yields. Frequent natural fertilization and reliable watering practices can decrease the area needed even further, depending on the plant type.

    Most herbs, short-rooted root vegetables, and vines with smaller (1lb or less) produce can be plated high in hanging containers, and simply trail their fruit downwards in a beautiful cascade of greenery, flowers and food. Some strawberries also trail quite nicely.

    If you wish to hang a plant that has up to 3lb fruit, use a larger container, strong hooks, sturdy hanging material, and hang it just below shoulder-level, under smaller hanging plants to add visual interest. Bulky hanging plants should be part of a full living arrangement instead of stand-alone to avoid them looking clunky and unwieldy.

    On hanging tomatoes; Cherry or smaller-sized tomatoes can do exceedingly well hanging upside-down as well to conserve even more space. A few tips; Mulch the top of the tomato's soil, or plant herbs at the top of the container to reduce evaporation and the need for constant watering. Be sure to hang tomatoes out of a breezeway, as they can spin in a wind, and too much spinning leads to a broken plant. Larger tomato varieties don't produce as well when hanging inverted, as the weight can easily become too much for the plant, which may sense it's difficulty and slow flowering, ripening, and potentially decrease your overall harvest.

    A bonus: container gardens can be brought indoors when it begins to cool off in order to extend the harvest throughout the winter if desired.

    There are a lot of great books out there on container gardening for food, and growing in cramped quarters. Visit Amazon.com and search for "Square Foot Gardening", "Container Gardening", and even "Worms Eat My Garbage". Be sure to also check the recommendations of similar books below the description to find precisely what you are looking for.

    Happy Harvests!

    Thursday, June 25, 2009

    8 Steps To A Packing Party

    We are moving, and having one heck of a time getting it all done on time, so we need help. LOTS of serious help. So I put my head together with a couple of my friends and we came up with some resources that I had forgotten about in my "old age". See, I've used these types of resources before, but had seemingly forgotten about their availability in my time of stress. I'd only ever used these techniques when I wasn't stressed.

    So here it is, 8 steps to a moving party!

    1. Find that extra food you don't want or need, that you aren't in the mood to move to your new place.

    2. Find your hungry friends; Folks who don't have the money to eat really good food, or those that don't have the time or means to cook for themselves most of the time.

    3. Load up on flattened boxes and tape.

    3. Offer your friendly square kids a gourmet meal and food to take home with them in exchange for helping around the house.

    4. Badger your friends in a friendly manner for several days after the agreement is made to get them to actually come over.

    5. Start cooking your meal and send them word that food will be ready in about an hour if they want to come over right then and get to helping out.

    6. When they arrive, set the helpers to work while you finish dinner. Let the food cool a bit after it's done until you get at least 1/2 hour's work out of them to make sure they are geared up and set into the work frame of mind for the next few hours.

    7. Feed them really well, and with food they haven't been able to afford for themselves. (I used shrimp kabobs, venison, and bison from my freezer that I got on clearance or gifted to us during the past year, and that I didn't want to have to move to our new place, and macaroni & cheese.)

    8. When they day is done, send each person who helped home with at least one bag full of food for their own home.

    That's it! Soon your house will be nearly swarming with folks just itching to work, and more stuff will be done by the end of the night that had been done on your own for over two weeks.

    Optional step seven: Ask them to come back the next day and help some more for more food and happy helping goodness.

    Tuesday, January 20, 2009

    Visual Differentiation

    Fixed my laptop the other day by replacing the broken LCD screen, and a friend of mine did a photo shoot during the repair process. I just got the email with the photos yesterday, and not only is my neck wobble diminished, my HANDS are thinner!

    We all know how hard it is to loose that stubborn pudgy-fingeredness (yes I know it's not a word, but I like it anyway, so there!), that one gets when exceedingly overweight, but I've done it. My hands are looking better now in addition to the rest of me!


    I almost have almost normal-looking hands again! Hooray!


    Monday, November 24, 2008

    Delightfully Decadent Eco-Decor: Fall & Winter Series; Autumn Potpourri

    The first in our inexpensive recycled autumn & winter crafts series for 2008 is Autumn Potpourri.

    Ages 3+

    Supplies:

    • Clove essential oil
    • Acorns
    • Small pinecones
    • Small tree leaves (Maples are pretty)
    • Spices: cinnamon sticks, whole allspice, star anise, whole cloves and whole bay leaves
    Directions:
    1. Place all the ingredients except bay & tree leaves in a large colander.
    2. Add some drops of essential oil to the mix & toss gently.
    3. Drop in more essential oil until the scent is strong enough for you.
    4. Add all leaves & lightly mix.
    Display in a bowl. Add a single glass-contained large candle or three glass-contained votive candles for accent and gentle heating of the potpourri for better scent dispersal.

    * Since we are running so far behind on these crafts this year, some posts will be served with photos of the creations of others. This photo property of Good Hope Botanicals.

    Sunday, November 23, 2008

    Delightfully Decadent Eco-Decor: Fall & Winter Series

    *Whoops!*

    I am determined to get some of this done before the holiday season really gears up into full swing.

    The family has already started the Thanksgiving tree and countdown turkey this year, so other crafty goodness must assuredly follow. *smile* (Instrictions for 2 different varieties of bonsai Thanksgiving trees, large Thanksgiving wall tree tutorial, crafting a Thanksgiving countdown turkey)

    First things first.

    To do all of the crafts in fall portion of this series correctly, we must start with a nature walk to gather free materials. This can be a lot of fun, so pick a nice day and get out of the house for a while.

    How can you make it more than just a simple no-cash craft-supply shopping spree?

    This can be a special family time just as valuable as doing the crafts themselves, so bring everyone, and make the most of it.

    * Make a list for each family member, give them two reusable fabric grocery sacks or canvas totes and a plastic grocery bag, and call it a scavenger hunt.

    What's the plastic bag for, you may ask? Picking up any litter you might find on your hike! Nothing makes a nature walk even better like leaving it nicer than it was before you found it, and protecting the environment and local wildlife in the process.

    * Turn it into an educational event for fall plant and tree identification, a wild food hunt and gathering party, or seed some untended areas with winter food for local animals.
    Here's your list of things to get while out**;

    Tall grasses with the seed heads still attached. (20)
    Twigs with branches off of them, or dead tomato plants with the leaves stripped off. (5)
    Dried Leaves (2 plastic bags full)
    Small log or large branch section (2)
    Pinecones (15)
    Small pinecones (20)
    Birch bark strips (about 25)
    Small nuts, shells, woody misc (1 plastic bag)
    Feathers (any you find on the ground)

    Other Supplies Needed (or that might prove useful);

    Waxed paper
    Busted crayons
    Scissors
    Apples
    Cheese grater
    Oranges
    Markers
    Yarn
    Hand quilting thread
    Whole cranberries
    Clove oil
    Iron
    Baling wire (or metal coat hangers and pliers)
    Ribbon
    Empty, clean food cans (any sizes)
    un-popped popcorn (unflavored)
    Glue stick
    Air popcorn popper (or other popping method)
    Sharp darning needles

    From the spice cabinet: vanilla extract, cinnamon sticks, whole allspice, star anise, whole cloves, whole bay leaves, pumpkin pie spice

    * State and national conservation areas may have a law regarding gathering of plant matter. Please check your state's regulations and stay legal!

    ** List is for one-2 of each project. For more projects, get more goodies.

    *Whoops* : I accidentally forgot to change the date of posting to reflect the actual date I posted this instead of the date I started writing it. Sorry about that. *blush* All better now!

    Wednesday, September 24, 2008

    Is It Really Frugal?

    You've likely heard me talk about saving money vs saving time and what the difference is, as it's a somewhat common subject in my conversational repository. I can talk for hours on the benefits of making your own things when it comes to recycling, reusing, and saving cash, and I nearly always manage to work in that if you are spending more time making it yourself than what it would cost to go out and buy an item, it's not really a frugal option. But how do you figure out how much your time is worth?

    Well, my time is usually worth about $10/hr. It's a set rate based on everything I do in the home and in my business, what it would cost per hour to have somebody else do it for me, then divided by my waking hours each day.

    Everyone's value will be different, and for each activity there may be mitigating circumstances such as whether you like the activity or not, that can raise a particular activities value for you personally.

    For example, if it costs less money for supplies to make it yourself than buying it at the store, is it really less expensive in the long run? Let's see shall we?

    I'm going to use the laundry detergent I made a few years back as a good example, but with modern pricing.

    We've already stated that it costs less for the supplies than it does for the detergent straight across, so let's just estimate that to fill a 5 gallon bucket half-way with powdered detergent, it costs about $15 for the supplies. Not bad, considering that it would cost about $20 for even the cheapest chemical-filled detergent to fill that much space, and our detergent is higher quality, raising the store-bought price to nearly $40 for that much natural, eco-friendly, phosphate-free detergent with good cleaning power.

    So far we have a great deal!

    Now for the time factor. It takes me about 2 hours to grind down two bars of Fels Naptha by hand, or 10 minutes in the food processor, which ads the electrical cost of about a penny and a clean-up time of about 25 minutes to wash all the soap remains off of it so that it will be ready for food prep again. By hand, we have a cost of $20 just for grating, and $5 if we use the food processor.

    Already our make-it-yourself detergent is raising in price!

    Now let's take the time to open and dump all the boxes of goodies like borax, baking soda, and generic oxy-clean we've purchased for this little endeavor. That takes about 10 minutes on it's own, and these powders are heavy.

    We take about 12 minutes in the store to buy these ingredients, if we go to a store that carries them all instead of having to go to a couple of different stores to buy it (wasted gas money). It takes 2 minutes to just buy detergent. 10 minutes spent.

    Mixing takes yet more time, and to make sure that everything is mixed evenly, it takes about 20 minutes more, as shaking is by far the most effective method of mixing, and for that we have to snap the lid on tight, heft the thing, and shake for a good 5 minutes, then take the lid off and stir and repeat until it is good and mixed, or do the same thing without lifting and kick the sealed bucket around the house, chasing it, then stirring, again, repeating a few times to ensure a great mix.

    Every time we do the laundry, we have to spend two minutes opening and closing the bucket (we'd hate to get moisture in it and waste all our hard work, right?), and since 2.5 gallon bucket of detergent washes about 105 loads, that adds up quick to 205 minutes, or 3 1/2 hours just fiddling with the container on wash days.

    So we've spent nearly $60 on our detergent if we've made it by hand, or $45 if we've used the food processor to speed up the work.

    Best case scenario, we're spending about $5 over what it would cost for equally green detergent if we just bought it at the health food store. Not looking like such a good deal now, is it?

    Of course, if we get into the fact that this is mind-numbingly boring work, we bought all those separate things, all of which had their own packaging that we now have to find an eco-friendly way to dispose of, and that we now have a pickle bucket taking up a bunch of room in our laundry room instead of a smallish box, it gets even more ridiculous to make your own.

    We get some of our detergent for free, from sampling sites and the like, so our actual costs are even less than what we would spend if we went out and purchased all of our detergent at the store. Making our own detergent makes no sense, at least for our family.

    Of course, if you are taking your laundry to a laundry-mat and sit waiting for your clothes to finish, it might just be a valuable way to spend that time instead of just reading a book and waiting. See what I said about every circumstance being different?

    So you really need to consider all of the costs related to a money-saving activity in order to be able to properly decide if it will actually save you anything by doing it. Already doing some things by hand to save cash, but unsure if they are really saving you money? Decide how much you are worth per hour, then time yourself. You might just be surprised at how much your frugality is costing you.

    Thinking of a new project to save a little on the side? Involve the kids in the experiment, and use it as a life lesson and homeschooling opportunity. You'll be glad you did!

    Kacper Wrzesniewski from Poland, wrote a really good piece explaining your personal time's hourly value in his article "How much is your hour?". Go give it a read, it's good stuff.

    Are you doing something to lower costs that's not actually saving you anything?

    Thursday, September 11, 2008

    Delightfuly Decadent Eco-Decor On the Cheap

    Fall is rushing upon us, and if you're anything like me, you don't have a lot of cash lying around to outlay on cutesy decorations, but you still want to add a festive air to the house.

    Here's how we decorate for fall, a little at a time, as the season rolls on.

    Notice I said, a little at a time? That's your first clue.

    With everyone's busy schedules, nobody really has the time anymore to sit down and craft their little hearts out for an entire day at a time, and with apartments constantly getting smaller and smaller, a lot of us simply photograph their decorations from year to year, and dispose of the decor after the holiday to cut down on clutter.

    Most of my family's decorations are made from recyclable materials so that really helps to cut down on things going into the landfill, as we can take it to our local recycling center for re-use after we're finished with it, or simply toss it in with the compostables.

    The only things that aren't recyclable in some way are the things that we are keeping from year to year, or that we can give as gifts later. For example, our Halloween box is a mere 4"x2" in size, and goes into our overall decor box for all the yearly holidays, which is small enough to be easily stuffed into the top of our closet.

    We have no autumn decorations this year, so we're gong to be building things as the season progresses and posting them here for you to enjoy and create for your own home. Every craft will contain at least one re-used item, and most of them will be fully recyclable when the season is over.

    Stay tuned for detailed instructions for beautiful, fun, and elegant crafts in this ongoing series.

    Thursday, September 04, 2008

    Recalibration

    A good friend of mine, Maurkus, left a fabulous comment on my last message to you that is going to save me about $25!

    If your scale is reading wrong, you can do it too, save yourself the price of a new one, and be able to save that money for other important things.

    So here's how it works.

    Most scales have a dial on them that you can use to reset the scale to zero. If your zero, like mine, is not really zero, you can take an item of known weight, like a gallon of water, and put it on your scale, then set your scale, using the adjustment dial, to read the weight that it should.

    If you have a digital scale, and not a dial one, check online at the manufacturer's website for the user manual. Most places have their manuals downloadable in PDF format, and if you are capable of recalibrating your scale, the information will be there in the manual. Dial scales are easier, as you just locate the little dial or knob on the scale's body, and twist it one way or the other until you find where it needs to be.

    Why not use a gallon of milk? After all, a gallon is a gallon, right? Actually, not exactly. A gallon is a volume measurement, not a weight, so a gallon of molten lead would weigh a LOT more than a gallon of oxygen, for example, but they are both still one gallon measures. That said, a gallon of water weighs precisely 8.33 pounds, and a gallon of milk weighs between 8.62-8.68 pounds depending on it's fat percentage. It's a density thing*.

    I'm not a big stickler for the tenths of a pound thing, but if you are, or you're on Weight Watchers (I've heard they're sticklers on that), use a gallon of water for your calibration, because we know exactly what that weighs. We'll end up using a gallon of water as well, but only because we buy the organic milk in the recyclable glass bottles from our local dairy. (amazingly, the local, healthier, and much more flavorful and rich milk is less expensive than the big factory-farmed milk that causes me intestinal distress from all of the chemicals and additives they put into their cows). It's a no-brainer for our family!

    Thanks to Maurkus, and his great suggestion, I will be able to go fix my scale sometime here in the next couple of days, and finally get an accurate weight! Hooray!

    *Average milk weighs 8.6 pounds a gallon but as cream has a wide range of variations in the per cent of butter-fat it contains, milk varies in weight in proportion to the change in the per cent of fat. Butter-fat or Milk-fat is the lightest constituent in milk, having a specific gravity of .93 while the average specific gravity of milk is 1.032. ~ Source~ "Standardization of milk and cream" from the library of the University of Illinois

    Thursday, July 03, 2008

    UnGuzzling

    With the rising cost of gas gouging holes in everyone's budget, and the 5 cent off per gallon Kum&Go gift cards no longer reloadable, I decided it was time to tackle some of the methods you can use to cut fuel costs.

    Our family just moved closer to the majority of our daily activities so that we could walk or ride bikes more often to where we needed to go. This alone has cut our fuel consumption by 75% in the last month.

    The first rule of driving to conserve fuel is to drive as if you were riding a bicycle. A lot of the ways I drive a vehicle, I learned when I was taught how to ride a ten-speed. Now, many years later, I am truly surprised to discover that a lot of the methods I have been doing since I bought my first car are now being suggested by the people who vehemently encourage fuel efficient driving.

    Hooray for instinct! *grin*

    Find out if your town is flat or slanted. We were happy to discover that our entire town slants down hill towards the southwest corner. This means that traveling to run certain errands or visit some of our friends takes less gas than going other places, as we can coast almost the whole way in one direction. We've begun to plan our trips so we can take advantage of the slant more effectively.

    There's a lot more conservation methods on my advice & services blog; Earthereal Guidance.

    Since we're talking about saving money, the freebies have started back up over at Products & Places as well. It's just a weekly thing until I get the time on my hands to do more, but with the prices going up all over, every little savings means a lot!


    Wednesday, May 14, 2008

    Home Again, Home Again, Jiggitey Jig!

    After a long time searching, and long time waiting, we received the call today that our application has been accepted for our new home, and we can begin moving in tomorrow!

    It's a good thing too, as the 15th is the last possible day we can have anything of ours in my mother's garage. *chuckle*

    As you may have heard me promise, tomorrow will be a moving party! If you know us well enough to have our phone number, then you're invited. Starting at 2pm, we'll have treats, snacks, goodies, beverages, and some gas money for anyone who wishes to attend and help us ferry stuff from my mother's house to our new abode.

    If you've ever wanted to meet all these other people are I'm always talking about, or just wanted to attend a party or have a good meal at my place, come on over and join the fun.

    We're finally on our way home!

    Thursday, April 03, 2008

    Campaigns, Learning, & Coding, oh my.

    I think I've finally figured out how to make the template work for my campaign site, after much angst over such questions as "what is this", "how does it work", "why do I have to learn PHP and CSS to build a website", and more. Due to not having the time to wait for anyone to have free time to do it for me, I've been forced to do it myself. Spring is an exceedingly busy time for most people, and this spring has brought graduations, moving, marriages and more to those around me. Like I've always said, if something needs done immediately, the only person you can really rely on to get it done is yourself, and you'd better make the time to do it in. Needless to say, I'm learning new computer languages again. *chuckle* The only problem is that my server is having some sort of trouble translating the template I've modified, and the customer service for my exceedingly inexpensive hosting company is nigh-on nonexistent, so I can't really rely on them to help me fix things.

    Kind of on my own, and without the basic knowledges needed to to the job, but as long as I have the internet and my beloved Google, I can learn anything. I've done what was declared impossible before, and I'm on my way to doing it again. Three days to a website, with three new programming languages I know very little about, and major editing in store. Let's see how it goes, shall we? Of course, getting the content in there properly so I can go live with the site and show it off to you will be another matter entirely, but hopefully that will only add another two days or so to the projected time line. *chuckle*

    Wish me luck!

    Sunday, January 06, 2008

    Smart Strips: As Seen on Oprah

    Miftik saw a new product on Oprah, and shared her "green" discovery with us. Smart Strips are power strips that turn on and off all of the devices using the strip for energy supply when you turn on one main device. Simply plug a control device into a specific spot of the power strip. Then you plug in the peripherals in the other plugs. When you turn on and off the control device, such as a computer, the extras are turned on and off as well.

    I went to their site to check the product out, as I'd never heard of it before, and $40 for a power strip isn't my cup of tea. And while the refurbished ones are a little less than $30, there are none available on the site at this time.

    You can save even more energy (and money) with a regular surge protecting power strip than you can with a Smart Strip, however. They do have a great marketing strategy, because some people are just too lazy to flip a switch at the end of the day after shutting down their computers, so I can see a use for it for those folks, but it is not a product for the radically frugal or eco-conscious.

    How can you save more energy than using these expensive devices, you may ask? Computers, Televisions, and many other electronics suck 40% of their full operational power, even when turned off. The "control" device is the DVR, Computer or other device that you plug into the master plug on the Smart Strip, which allows the main machine to continue to pull it's "powered off" standby-mode electricity. When the power demand raises in the master plug (caused by turning on the device), it turns on the rest of the strip, allowing power to the other things plugged into it, and thus turning them on automatically. It does turn off all power to the extras, as far as I can tell by the website, so it will save a bit of electricity if your peripherals are also always-on-standby-type machines.

    Even the lowest cost surge protecting power strips can be turned off with a button and shut off all power to everything plugged into the strip. This stops not only your peripherals from sucking power as the Smart Strips do, but also stops your computer from doing it as well, saving you a good $1 or more per month, per computer, even in low power cost areas. Add to that the fact that a power strip that can do what I mentioned is about $4 at the local hardware store, and you will save a good chunk of change immediately.

    Method: shut down computer, flip the button on the strip (with your foot if it's on the floor). We do this with the constant-on-standby kitchen appliances too, with a power strip on the counter. It feels really good to be able to prevent most an entire room from drawing electricity when you aren't using it.

    Miftik thinks the green revolution is likely to fail, and with hundreds of products like the not-so-Smart Strips being toted as the greenest option and advertised on popular shows like Oprah, it doesn't look good for the average joe to learn how to do it right.

    (UPDATE 5/6/08 : I recently discovered that the Smart Strips have a protection policy. Products plugged into the strip are insured from electrical surge damage for up to $30,000, which is nice, but insurance of this type is rather to be expected from a power strip of the Smart Strip's price range.)


    Technorati Tags: Del.icio.us Tags: Bits Smart Strips Awards, Bits

    Wednesday, March 21, 2007

    Making Organic Dirt & Natural Gardening Tips

    Seems nearly everyone is having a shortage of good, organic dirt these days.

    I have been hearing from a lot of my gardening friends about how this spring they will be needing to purchase quite a bit of organic dirt, but I have found a solution!

    You can make your own healthy soil pretty easily by tossing some cardboard in the bottom of a container (or straight on the ground where you plan to plant), Then add manure, top with leaves, then sand or vermiculite, some kitchen waste, straw, more manure, more sand or vermiculite, more leaves, and repeating until full. It takes a bit to get great soil out of it (more of a start-in-the-fall type project), but I've done this with dirt in place of about half the manure & leaves in spring with good results. For regular ground instead of containers, forgoe the cardboard in spring projects and instead opt for two layers of newspaper as the first layer.

    If you don't have a lot of kitchen scraps (we don't), you can contact your local grocer, and they will likely save their out-of-date produce for you if they know you are going to use it for compost or feeding animals, as it saves them on their trash bill while helping the enviornment. Most stores will jump at the opportunity.

    Manure can be acheived free at most horse stables and cattle ranches, Leaves are free by the pre-packaged bag-full at area yard waste drop-off facilities, Shredded newspaper or peat moss can be used in place of leaves if necessary, and dirty straw can be found by contacting stables and animal shelters.

    I still have to buy sand or vermiculite, but that is only because I am in the Ozarks, and there aren't a lot of great resources around here for those.

    Warning: This soil will be high in nitrogen if created in the spring, and you may need to add some rock-based mineral ammendments to create the precise mix you want and lower the nitrogen content if desired. Then again, you might want some other ammendments anyway, depending on your prefrences.

    ---------

    As an added soil bonus, some people like to sprinkle water absorbing polymers to their manure layer to increase water absorptopn and decrease the need for extra wateringin containers and during the hottest months.

    ---------

    Newspaper spread over the top of your ground or container dirt after planting acts as a water-preserving mulch and also keeps most weeds from disturbing your gardening joy.

    ---------

    Last year's holey hose works great (enlist the kids to poke lots more holes) as a drip irrigation system when strewn around the base of your plants.

    ---------

    Get your repellants ready now!

    Mix baking soda, cornmeal, roughly ground eggshells, and grits in equal parts, and keep it in a dry spot for sprinkling lightly under your plants to deter most fungi, cutworms, slugs, snails, and ants. Should require only 1-3 applications all season.

    Make a gallon of spray by making a tea of 20 teaspoons ground red pepper and a gallon of water. After straining, add 10 teaspoons of organic natural castille soap and mix thoroughly. Pour your mix into a spray container and mist your plants weekly or after each rain (tomatos may require more frequent spraying). Be sure to get underneath the leaves with each application. The hot pepper repells most plant eating animals and some insects, while the soap eats away the protective oils from other insects like ants & aphids.

    For extra light in low-light areas and additional bug deterrant under your plant's leaves, place some aluminum foil, shiny side up around the base of the plant.

    ---------

    If your neighborhood has a problem with Japanese Beetles, don't buy a trap for your yard, buy one for each of the neighbors down the street on either end from you. The traps send out a pheremone that attracts the beetles from as much as 5 miles away. Wouldn't you rather your neighbor had them going over there instead of coming to your yard? Bonus: The neighbor will think you are awefully nice to buy traps for them to help them fight the battle, and it really does help in controlling the neighborhood population. *grin*

    ---------

    Image above is "Totally Impromptu", a painting I created at a local drinking establishment, and my entry for this week's Illustration Friday.

    Thursday, November 23, 2006

    Bonsai Thanksgiving Trees

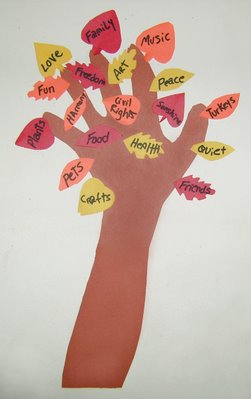
    Back when I posted the Thanksgiving tree craft, I hadn't given much thought to the space requirements for such a large project. Luckily, Heather mentioned it in the comments, and two more great ideas were born.

    So with no further adieu, I present to you, bonsai Thanksgiving trees!

    Mini Wall Tree

    Supplies
    * A paper grocery bag
    * Colored construction paper (for leaves)
    * Tape or Glue stick
    * Family & friends
    * Black Marker
    * Envelope or Small Basket
    * Scissors

    Instructions
    * Trace someone's forearm and hand out on grocery bag and cut it out.

    * Cut several different types of small (1") leaf shapes out of multi-colored construction paper.

    * Glue stick (walls wipe down pretty easily with water) or tape the tree to the wall.

    * Put the leaves and marker in the basket or envelope, and place on the floor under the tree, or attach the the wall.


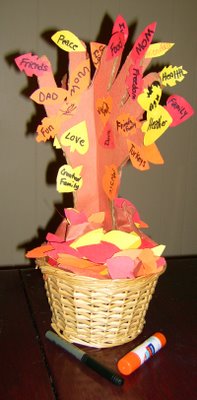
    Standing Centerpiece Tree

    Supplies
    * Brown posterboard (or cardboard with brown construction paper glued to it.)* Colored construction paper (for leaves)
    * Glue stick
    * Family & friends
    * Black Marker
    * Small Basket
    * Sissors

    Instructions
    * Trace someone's arm and hand on the posterboard twice and cut out carefully, being sure to make the bottoms as flat and straight as possible. (You may want to forgo thumbs in favor for a few extra fingers to make "even" limbs on your tree. Height of tree depends on how much arm you trace. Extra-tall trees may require additional support -cardboard, coathanger, etc.-)

    * Cut several different types of small (1") leaf shapes out of construction paper.

    * Cut trees in the middle (one from the bottom going upwards, one from the top, pointing down) about half-way through, and slide together to make stand upright.

    * Place standing tree in a small basket.

    * Put the leaves in the basket. (If the basket is deep, you may fill it a bit at the bottom with some crumpled brown paper. For very shallow baskets, some tape may be desired to add extra stability to the tree.)

    * Display tree in prominent place in the home such as the center of the dining or coffee table.

    * Place marker and gluestick in the basket as well, or on the table nearby.

    Family photos with the tabletop tree are great to add to a holiday scrapbook for keeping the memory alive forever. It's even a great gift for the hosts of your celebration.

    The standing centerpeice Thanksgiving tree is my addition to The Box Doodle Project.
    ---------

    As family and friends think of things they are thankful for, they can go write/draw their thanks on a leaf, gluing it to the tree. By the end of the day you have a beautiful autmn tree, and everyone is bursting at the seams with warmth, comraderie, and appreciation.

    If making the tree in advance, or taking it to a family gather elsewhere, you may wish to premake and attatch a few thankful leaves yourself so that others get the idea.

    Creating these quicker, smaller trees of gratitude is a great way to keep the kids busy while you prepare for the feast. If several families are getting together, one adult or older child can guide all of the kids in creating their own personal tree to take home and appreciate blessings on for the rest of the month. An added bonus, they compost beautifully, making for a nice earth-friendly craft. *smile*

    What a great way to get the holiday spirit flowing.

    Thanks Heather, and Happy Thanksgiving to everyone!


    Tags:

    Monday, October 30, 2006

    No Coats Over Costumes


    Have a Halloween costume that is really lightweight or shows a lot of skin and it's getting cold outside? Want to still look your Halloweeny best? Worry no more, I have the answer for you.

    Pantyhose

    You heard me right, pantyhose. They're tan colored, and most people won't notice you are wearing them even in broad daylight, much less in the dark of the evening at a party or while trick-or-treating.

    How to:
    Grab a couple pair and carefully cut out the cotton area in the crotch of the hosiery. Cut off the tips of the feet, and use it as a shirt (the groin hole is the top where your head fits, and the "waist" covers your torso and chest). Use multiple layers for added warmth. Slip some on your legs as well, and you can still maintain the full cool factor of your costume without feeling cold.

    Tips:
    * To keep the hosiery from rolling up, snip a small hole in the end and slip your thumb through to hold it in place.

    * For additional warmth, get an old set of thermal underwear, cut to fit under the costume, and wear the hose over the top. Cozy!

    In the image above, the girls have pantyhose sleeves and leggings, double-layered. The temperature was about 45 degrees and they were comfortable. Formal showing off and introduction to their costumes coming shortly. *smile*

    Tags:

    Thursday, September 21, 2006

    Guerrilla Gardening - 12 Steps To Addiction

    So Problogger is having a community writing project for "how to" posts on blogs, and the weather is cooling off. "What can I write?", I ask myself. A how to about Guerrilla Gardening of course! So, here, at the end of most people's growing season, I will talk about planting and growing beautiful, healthy plants in neglected public places for the benefit of the community and the beautification of whatever neighborhood you decide to use as a palette.

    Warning: there is no recovery program for horticultural addictions.

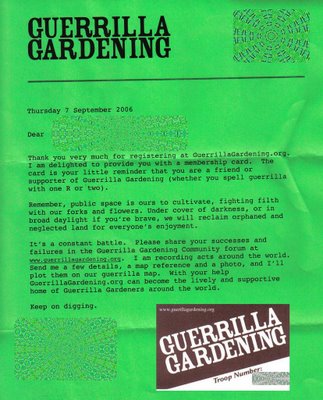
    I Received a mysterious brown envelope in the mail the other day with no return address and a stamp picturing beans and seeds. The postmark says NY, NY...

    When opened, I found my new troop identification card and welcome letter for GuerrillaGardening.org! *grin*

    See, I have a confession to make. I am a guerrilla Gardener. I take abandoned, ugly, lackluster, public planters, plots of land, and empty spaces and make them beautiful or productive by planting them full of flowers, landscape plants, or garden goodies. Think of it as community service. I help make the city beautiful, while encouraging people to stop for a moment and enjoy the beauty of simple existence. I started My addiction to nocturnal horticulture this past spring when I saw a link to GuerrillaGardening.org on one of my many favorite websites.

    The greatest part about it: It's perfectly legal!
    Tied for Second: Making pretty in the city. Getting the kids involved and counting it as community service on the school records.

    1) Find a likely neglected spot or several.

    2) Be sure it is truly neglected. (cigarette butts are a good clue)

    3) Gather up some tools for the job like peat moss, composted manure, natural fertilizer water mix, and seeds or baby plants. (Plant starts are the preferred choice
    so you don't have people accidentally stomping on or putting out cigarettes out on your new tender seedlings)


    4) Under cover of darkness, prepare the soil for planting.


    5) Plant the seedlings and seeds and water well.


    6) VERY well.


    7) Water at least once every three days for the first week, then switch to once a week or so as you can manage.

    8) Wait.


    9) Replant or replace the things that get smashed by inconsiderate pedestrians.

    10) Wait some more.

    11) Get rewarded with healthy plants to look at every time you wander by.


    12) Don't forget to keep watering, fertilizing with natural fertilizers, and to pollinate flowers if necessary.
    I'm already planning for next year. For my first time ever doing this, I think it went great!

    What's your secret addiction?


    Technorati Tags: