


 Back when I posted the Thanksgiving tree craft, I hadn't given much thought to the space requirements for such a large project. Luckily, Heather mentioned it in the comments, and two more great ideas were born.
So with no further adieu, I present to you, bonsai Thanksgiving trees!
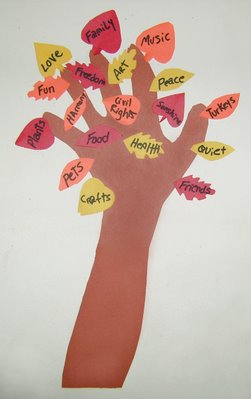
Mini Wall Tree
Supplies
* A paper grocery bag
* Colored construction paper (for leaves)
* Tape or Glue stick
* Family & friends
* Black Marker
* Envelope or Small Basket
* Scissors
Instructions
* Trace someone's forearm and hand out on grocery bag and cut it out.
* Cut several different types of small (1") leaf shapes out of multi-colored construction paper.
* Glue stick (walls wipe down pretty easily with water) or tape the tree to the wall.
* Put the leaves and marker in the basket or envelope, and place on the floor under the tree, or attach the the wall.
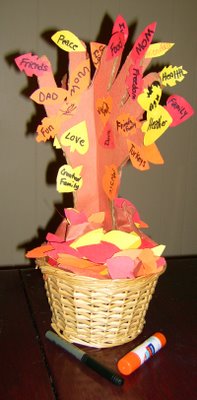 Standing Centerpiece Tree
Supplies
* Brown posterboard (or cardboard with brown construction paper glued to it.)* Colored construction paper (for leaves)
* Glue stick
* Family & friends
* Black Marker
* Small Basket
* Sissors
Instructions
* Trace someone's arm and hand on the posterboard twice and cut out carefully, being sure to make the bottoms as flat and straight as possible. (You may want to forgo thumbs in favor for a few extra fingers to make "even" limbs on your tree. Height of tree depends on how much arm you trace. Extra-tall trees may require additional support -cardboard, coathanger, etc.-)
* Cut several different types of small (1") leaf shapes out of construction paper.
* Cut trees in the middle (one from the bottom going upwards, one from the top, pointing down) about half-way through, and slide together to make stand upright.
* Place standing tree in a small basket.
* Put the leaves in the basket. (If the basket is deep, you may fill it a bit at the bottom with some crumpled brown paper. For very shallow baskets, some tape may be desired to add extra stability to the tree.)
* Display tree in prominent place in the home such as the center of the dining or coffee table.
* Place marker and gluestick in the basket as well, or on the table nearby.
Family photos with the tabletop tree are great to add to a holiday scrapbook for keeping the memory alive forever. It's even a great gift for the hosts of your celebration.
The standing centerpeice Thanksgiving tree is my addition to The Box Doodle Project.
---------
As family and friends think of things they are thankful for, they can go write/draw their thanks on a leaf, gluing it to the tree. By the end of the day you have a beautiful autmn tree, and everyone is bursting at the seams with warmth, comraderie, and appreciation.
If making the tree in advance, or taking it to a family gather elsewhere, you may wish to premake and attatch a few thankful leaves yourself so that others get the idea.
Creating these quicker, smaller trees of gratitude is a great way to keep the kids busy while you prepare for the feast. If several families are getting together, one adult or older child can guide all of the kids in creating their own personal tree to take home and appreciate blessings on for the rest of the month. An added bonus, they compost beautifully, making for a nice earth-friendly craft. *smile*
What a great way to get the holiday spirit flowing.
Thanks Heather, and Happy Thanksgiving to everyone!
Tags: craft crafts November Thanksgiving Thanksgiving craft family craft November craft art artist children kids kid child cheap inexpensive grocery bag craft paper bag craft autumn tree Thanksgiving Tree small bonsai tiny centerpiece fun beautiful


1 comment:
Thanks for the link to my page-very sweet. Ours turned out cute. We had little leaves already and I just cut them even smaller and wrote on them what the kids were thankful for (well, Little Artist was able to do her own). Love Bug let us know that she was NOT thankful for medicine on her chest (vapor rub). HAHAHAHA.
Post a Comment